There is a lot to keep track of in this game, but remember these key tips
Dragon Quest Treasures has finally arrived for Nintendo Switch, and with a 77 score on Metacritic as of this writing, most reviewers seem to think it’s a pretty good time. In my review, I found it to be a delightful way to pass the hours with a charming world and addictive gameplay. And as much as I do like the game, I’m aware that it doesn’t exactly do the best job of informing the player of everything they can do in it. Some things you’ll only learn via hint screens or in passing dialogue, so to better help those treasure hunters who are starting their journeys today, I thought I’d collect seven Dragon Quest Treasures tips to get you going the right way.
Heal your team and yourself
Healing is a pretty darn important part of most video games and that is true of Dragon Quest Treasures. Your monster squad is going to need your help recovering from any damage they take. There are a few ways to refill those HP meters of your squad. You can stop at a campfire, you can shoot your partner monsters with healing pellets, or you can be sure to bring along monsters that are capable of casting healing spells. When it comes to healing either Erik or Mia, you need to take a different approach and this can be easy to miss when it’s first explained. If you’re nowhere near a campfire and in desperate need of health, just stop what you’re doing and hold down the X button. The Dragon Daggers Erik and Mia receive at the start of the game can consume MP to heal them. You can’t heal either of the main characters with pellets or food, so if you’re in a bind, just remember to stop and hold X.

Hoard those Chimaera Wings
Chimaera Wings are a longtime staple of the Dragon Quest franchise, helping adventures get out of bind whenever they need to reach safety in a jiff. In Dragon Quest Treasures, they work as they do in the mainline games, whisking your team from the field of battle and back to their treasure base camp. If you’re ever outnumbered or your monsters are on the verge of getting knocked out and losing the treasure they’re carrying, a Chimaera Wing will get you home safely with all of your treasure intact. Just try to not be so careless with them. Chimaera Wings are surprisingly sparse in Treasures, and if you end up using your supply with reckless abandon, you might not have one on hand when you really get yourself into trouble. Instead of using a Chimaera Wing, try to always have a monster on your team with the ‘Sprint’ Forte. This will allow you to quickly travel great distances, hopefully getting you out of whatever mess you’ve gotten yourself into.
Stock up on pellets
You might be tempted to try and melee your way through this game, and while that is a possibility, you’re better off mixing in as much pellet play as you can. I started my journey through the world slicing and dicing the enemies I encountered, but by the end of it, I was playing support for my team of overpowered monsters. Obviously, you’ll want to stock up on healing pellets for your team as they can take a lot of damage in a short amount of time depending on the enemy encounter. But you should also grab as many elemental pellets as you can as they can easily strike down powerful foes.
The strength of your dagger strikes will grow as you level up Erik and Mia, but you can do a significant amount of damage right away if you have a good grasp on elemental weaknesses. And as you advance through the game, you’ll unlock new pellet types that can apply status effects to monsters in the wild, giving you options on how you approach every enemy encounter. Just be sure to stop at all the shops you find in the game as they all sell new pellet recipes that you’ll want to add to your arsenal.
Recruit like crazy
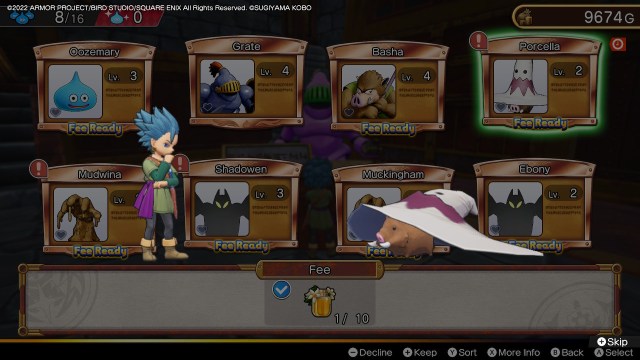
The game will make it sound like there’s limited space at your base camp in the early hours, but go ahead and recruit as many monsters as you can. First of all, you’ll be able to expand the barracks for your base camp just a few hours in. Second, you’re going to want a good variety of monsters for the squads you dispatch. Having a wide selection of monsters with different Favorite Treasures can help you achieve a higher Golden Ratio, which in turn will guarantee you better loot recovered by each of your dispatch teams.
Pay attention to the Golden Ratio
Speaking of the Golden Ratio, it’s incredibly important if you want to find the best treasure with your team or the monsters you dispatch. Unfortunately, Treasures‘ menu system doesn’t exactly make this easy. How it works is each of the game’s locations will have a few different treasure types listed for their Treasure Forecast. So let’s say The Paternoggin, the first area of the game, has Key Items, Hero Statues 1, and Cards listed in its forecast. To get a Golden Ratio of 100%, you’ll need your three monsters to have their Favorite Treasures be those treasure types.
If you match every treasure in an area’s forecast, you’ll have a 100% ratio that’ll make it easier to find more valuable treasure and make it easier to find the dig locations when you use your compass. If you have a low ratio or a ratio of 0%, you can still find valuable treasure, but you’re more likely to end up with a lot of bric-a-brac. When sending out your dispatch teams, you only need to worry about matching their Favorite Treasures to the Treasure Forecast. But when you’re putting together the team of monsters that’ll accompany Erik or Mia, you’ll have to consider their Fortes when assembling the team. That’s why, once again, it’s important to have a lot of recruits to choose from. And don’t worry, every monster you recruit will level up with you even if you’re keeping them in the barracks.
Cuff yourself to some Big Boys
If you’re able to achieve a perfect Golden Ratio, you’re going to want to make sure you can carry as much treasure as possible. Your initial monster squad will only be able to carry two pieces of treasure each, but as you explore more of the world and recruit bigger monsters, your treasure capacity will expand. If you want to pull in as big a haul as you can, and there are monetary bonuses for doing so, make sure you’re heading out with as many big monsters as possible.

Remember your Dragon Meter
This final tip I don’t ever remember being explained to me in the game. I just farted around one day and figured it out for myself. Basically, as you adventure your way through each area, you’ll start to build up a golden meter, which can be seen under Erik or Mia’s character portrait. When you max that out, holding down the R button will open the Dragon Attack menu. Each monster on your team has a powerful Dragon Attack that can do serious damage to some or all of the monsters your facing. With Erik and Mia, activating their Dragon Attack known as Wild Side will temporarily increase all of their stats and movement speed. Dragon Attacks are incredibly helpful when you’re dealing with treasure-hunter gangs trying to rob your base camp or when facing the most powerful monsters of the Snarl.


