Now that we’ve officially helped the guards in Brighter Shores’ first region, Hopeport, clear out some goblins, we’re off to explore the forest and all of its natural resources. This area is noticeably larger than Hopeport, with multiple zones locked behind quests.
Table of contents
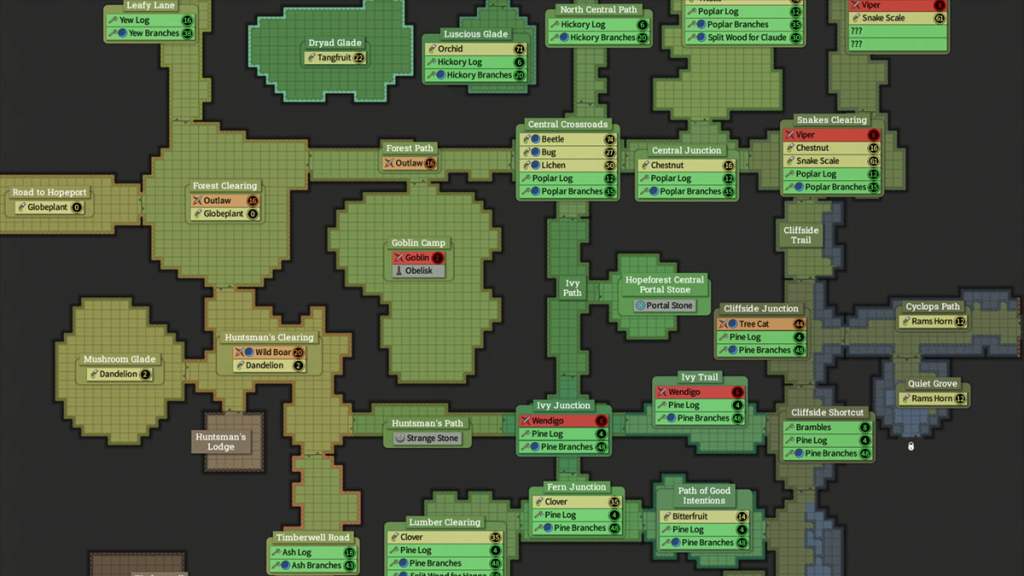
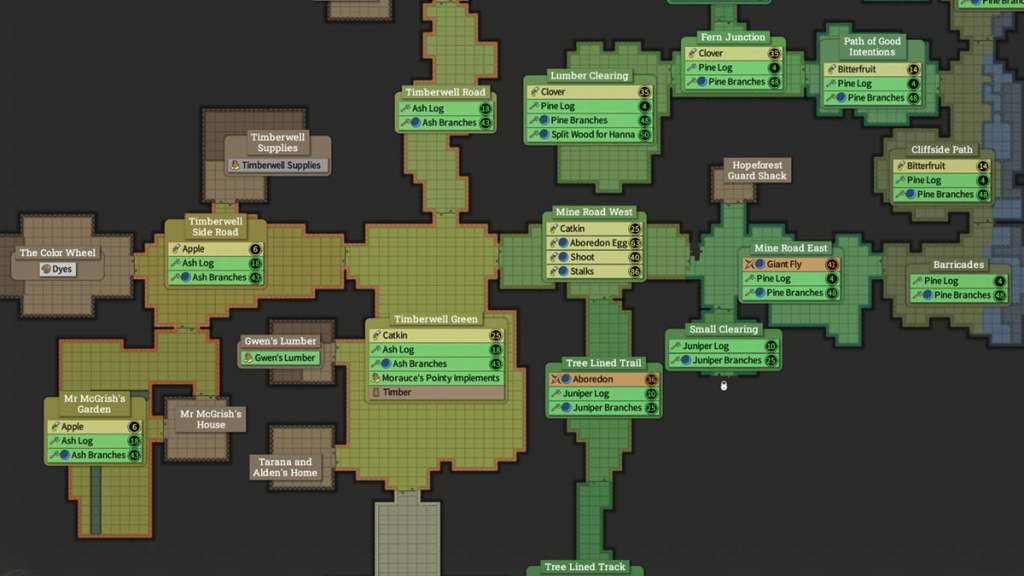
Brighter Shores Hopeforest map and locations


After advancing through Hopeport’s tutorial and episode one objective, you and some fellow guards will venture into Hopeforest and investigate some mysteries surrounding it. Along the way, you’ll unlock multiple locked areas, with some remaining closed until you advance through the area’s side missions.
The most notable examples of regions locked behind quests are the bogs north of the Road to Nowhere Much, Acidic Avenue south of Small Clearing, and any spots initially blocked by Brambles. While most of these are locked behind the main story, Spider’s Nest and Forgotten Things, a few require reaching level eight Woodcutting and clearing out brambles.
Outside of this, you can venture through most of the map just by running around and checking out the scenery. Just watch out for enemies!
Brighter Shores Hopeforest shops and profession locations
Another similarity between Hopeport and Hopeforest is the introduction of professions and shops to help you improve your skills. While Hopeport had five professions, Hopeforest has four: Gathering, Woodcutting, Scouting, and Carpentry. Although most areas in Hopeforest are helpful for improving these skills, there are new important places to check early on.
Huntsman’s Lodge
The Huntsman’s Lodge is home to Kedwick Shalstanger, a Hopeforest NPC who’ll help you during the Spider’s Nest side quest. Although there are no shops here, you will find a bedside cabinet and treasure chests if you want some quick cash.
Dryad Glade
Dryad Glade is one of the first key areas you’ll explore during Episode Two’s main storyline. You’ll meet a Dryad here, who’ll help you clear the corruption in the forest and choose a magical faction.
Crystal Clearing
The Crystal Clearing on the east side of Hopeforest is another crucial location during Episode Two’s main storyline. You won’t be able to reach this spot initially, but you’ll enter it later on.
Timberwell
Timberwell is your go-to for shops and professional development. You’ll buy tools like hatchets and hand saws here, and the Carpenter’s Workshop is directly connected to the area. Within this massive region is Timberwell Green, which has several roads connecting to it and Ash Log trees for early Woodcutting grinding.
Goblin Camp
Next up is the Goblin Camp, another important spot for tuning your weapons and armor. You had to do this before in Hopeport; this is Hopeforest’s version, and you’ll need to take a quick visit to make your gear suitable for this area.
Hopeforest Central Portal Stone
Ah, we love some good ol’ fast traveling. If you want to travel around Hopeforest more easily, unlocking the portal stone connected to Ivy Path should be one of the first things you do.
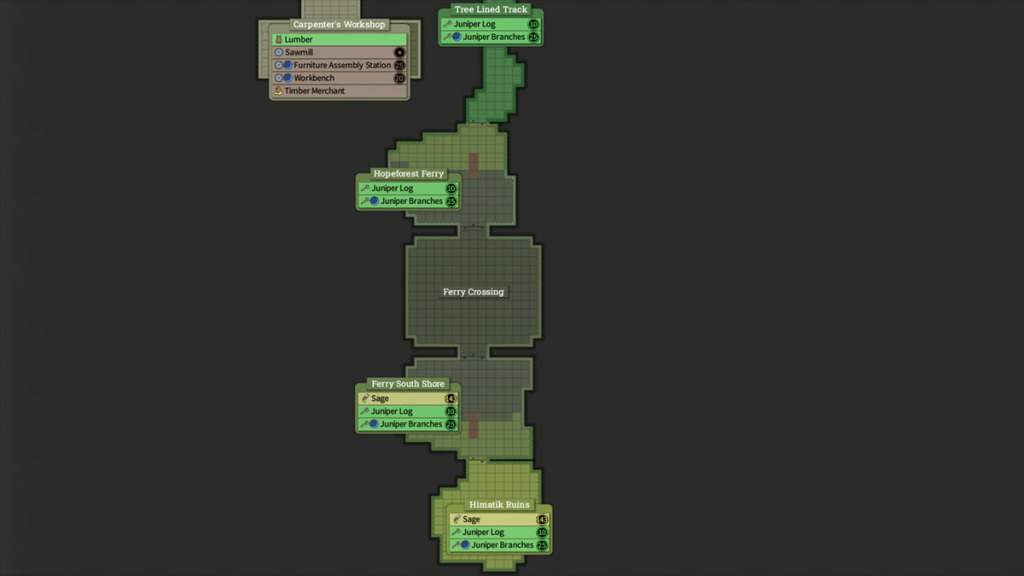
Hopeforest Ferry
Although a forest ferry sounds like a great fast travel method, it just brings you across a river. A fun fight ensues, but afterward, you just gain access to a high-level gathering resource and some juniper trees. You’ll also need to visit this spot during Episode Two’s main story, so let’s hope you don’t get ferry-sick.
Bear Clearing
Yes, Brighter Shores has bears. While most of the bears here are only level four, you can find a high-level boss bear if you venture deep enough into this clearing. You’ll need to visit this area during the main storyline, so make sure to get your levels up a bit.
Cliffside Path
Cliffside Path is where you’ll first begin the Spider’s Nest quest. You’ll find one of your fellow guards caught in a giant spider’s webbing and will embark on a mission to help him out.
Small Clearing
Another quest spot you’ll encounter later is the Small Clearing connected to Mine Road East, west of the Barricades. You’ll meet someone here who has some peculiar food taste but will be crucial in saving your pal during Spider’s Nest.
Barricades
South of Cliffside Path is the barricades, one of the last zones you’ll explore before moving on to Episode Three. Although you’ll eventually approach it later in the episode, you can visit it early to cut down some pine trees.
Brighter Shores Hopeforest resources
Much like Hopeport, Hopeforest has its own array of resources for you to collect, ranging from various wood types to enemies. Here’s the complete list of materials you’ll find, including their skill level and locations.
| Resource | Level | Location |
|---|---|---|
| Portal Stone | N/A | Hopeforest Central Portal Stone Hopeforest North Portal Stone |
| Strange Stone | N/A (Spider’s Nest unlock) | Tangled Path Huntsman’s Path Overgrown Trail |
| Ash Log | Lv. 0+ (Woodcutter) | Timberwell Road Timberwell Green Timberwell Side Road Mr. McGrish’s Garden |
| Oak Log | Lv. 2+ (Woodcutter) | Treeway Clearing Berry Glade Canopy Junction Treeway Trail Cutters Clearing Stump Clearing Stumped Path Canopy Lane |
| Pine Log | Lv. 4+ (Woodcutter) | Cliffside Junction Cliffside Shortcut Cliffside Path Barricades Path of Good Intentions Fern Junction Ivy Junction Ivy Trail Lumber Clearing Mine RoadEast |
| Hickory | Lv. 6+ (Woodcutter) | North Central Path Luscious Glade Secluded Junction Secluded Path Secluded Dead End |
| Brambles | Lv. 8+ (Woodcutter) | Shortcut Cliffside Shortcut Bramble Path |
| Juniper Log | Lv. 10+ (Woodcutter) | Small Clearing Tree-Lined Trail Tree-Lined Track Hopeforest Ferry Ferry South Shore Himatik Ruins |
| Poplar Log | Lv. 12+ (Woodcutter) | Snake’s Path Logging Area Snake’s Clearing Central Junction Central Crossroads |
| Suave Log | Lv. 14+ (Woodcutter) | Twisted Road Gnarled Path Wolve’s Den Shortcut Overgrown Trail Mushroom Grove Bramble Path Crystal Clearing |
| Yew Log | Lv. 16+ (Woodcutter) | Thin Trail Narrow Path Leafy Lane Leafy Junction Bear Clearing Two-Headed Bear Clearing Bear Hehind |
| Goblin | Lv. 2+ (Scout) | Goblin Camp |
| Bear | Lv. 4+ (Scout) | Bear Clearing Bear Behind |
| Wendigo | Lv. 6+ (Scout) | Ivy Junction Ivy Trail |
| Viper | Lv. 8+ (Scout) | Snake’s Path Snake’s Clearing |
| Spriggan | Lv. 10+ (Scout) | Treeway Trail Treeway Junction |
| Bramblelith | Lv. 12+ (Scout) | |
| Shade | Lv. 14+ (Scout) | Twisted Road Twisted Junction |
| Outlaw | Lv. 16+ (Scout) | Forest Path Forest Clearing |
| Wild Boar | Lv. 20+ (Scout) | Huntsman’s Clearing |
| Wildman | Lv. 25+ (Scout) | Leafy Junction |
| Moss Monster | Lv. 30+ (Scout) | Stump Clearing |
| Aboredon | Lv. 36+ (Scout) | Tree-Lined Trail |
| Giant Fly | Lv. 41+ (Scout) | Mine Road East |
| Tree Cat | Lv. 44+ (Scout) | Cliffside Junction |
| Satyr | Lv. 49+ (Scout) | Secluded Dead End |
| Wolf | Lv. 55+ (Scout) | Wolve’s Den |
| Globeplant | Lv. 0+ (Gatherer) | Road to Hopeport Forest Clearing |
| Dandelion | Lv. 2+ (Gatherer) | Huntsman’s Clearing Mushroom Glade |
| Goat Horn | Lv. 4+ (Gatherer) | Bear Clearing Two-Headed Bear Clearing |
| Apple | Lv. 6+ (Gatherer) | Timberwell Side Road Mr. McGrish’s Garden |
| Leek | Lv. 8+ (Gatherer) | Thin Trail Narrow Path |
| Haleberries | Lv. 10+ (Gatherer) | Berry Glade Treeway Trail |
| Rams Horn | Lv. 12+ (Gatherer) | Cyclops Path Quiet Grove |
| Bitterfruit | Lv. 14+ (Gatherer) | Path of Good Intentions Cliffside Path |
| Chestnut | Lv. 16+ (Gatherer) | Snake’s Clearing Central Junction |
| Bone Spike | Lv. 18+ (Gatherer) | Overgrown Trail Crystal Clearing |
| Beetroot | Lv. 20+ (Gatherer) | Canopy Lane |
| Tangfruit | Lv. 22+ (Gatherer) | Secluded Path Dryad Glade |
| Catkin | Lv. 25+ (Gatherer) | Mine Road West Timberwell Green |
| Bug | Lv. 27+ (Gatherer) | Central Crossroads |
| Femur Shard | Lv. 30+ (Gatherer) | Gnarled Path Wolve’s Den |
| Ancient Coin | Lv. 32+ (Gatherer) | Mushroom Grove |
| Clover | Lv. 35+ (Gatherer) | Fern Junction Lumber Clearing |
| Shoot | Lv. 40+ (Gatherer) | Mine Road West |
| Worms | Lv. 45+ (Gatherer) | Canopy Lane |
| Thistle | Lv. 48+ (Gatherer) | Logging Area |
| Lichen | Lv. 50+ (Gatherer) | Central Crossroads |
| Snake Scale | Lv. 61+ (Gatherer) | Snake’s Path Snake’s Clearing |
| Aboredon Egg | Lv. 63+ (Gatherer) | Mine Road West |
| Sheep Rib | Lv. 68+ (Gatherer) | Mushroom Grove |
| Orchid | Lv. 71+ (Gatherer) | Luscious Glade Secluded Junction |
| Beetle | Lv. 74+ (Gatherer) | Central Crossroads |
| Stalks | Lv. 86+ (Gatherer) | Mine Road West |
| Hazelnut | Lv. 99+ (Gatherer) | Canopy Lane |
| Acorn | Lv. 110+ (Gatherer) | Mushroom Grove |
| Sage | Lv. 143+ (Gatherer) | Ferry South Shore Himatik Ruins |


