Ideas for a violent deck.
Marvel Snap lets you build multiple decks around the cards you unlock. With a limit of 12 cards per deck, you can have one copy of each card per deck. Beyond these basic rules, it is completely up to individual strategy when it comes to choosing a deck build. However, there are some common strategies built into the cards that can be used together.
Destroy deck builds center around cards that destroy other cards and cards that benefit from being destroyed. New cards are being introduced all the time, and players may not have every useful card unlocked while reading this. That means that these destroy deck builds are just some examples of ways to get your cards to work together. Feel free to use them as a jumping-off point.
Basic Destroyers
Some cards are made to destroy and some are made to be destroyed. If you’re going to build a destroy deck, then you’re going to want to include these at the minimum:
- Nova: When this one-cost card is destroyed, it adds +1 power to all of your other cards on the board!
- Deathlok: This card will destroy all of your cards at a location. It has +5 power though it gains nothing from destroying your cards on reveal.
- Wolverine: When this card is destroyed, it comes back to a random location.
- Carnage: This card destroyers all of your other cards at this location on reveal, but it gets +2 power for each card destroyed.
- Venom: Much like Carnage, Venom will destroy all other cards at a location on reveal, but it takes the power of each card destroyed and adds it to its own. Holding on to this card a bit longer could make it very powerful.
- Sabretooth: When this card is destroyed, it comes back to your hand but doesn’t cost anything to play. You have a little more control over it than Wolverine, so you can wait until your last turn to slap its +4 power down.
Helpful Cards
Especially in the lower pools, destroyer decks can end up with lower power. Carnage will eat up three cards, for example, and then pretty much max out at +8, maybe +9 if Nova was one of the cards destroyed. Deathlok gains nothing from destroying your other cards, and Arnim Zola technically has zero power. A helpful strategy would be to get as many lower-cost cards on the board early, followed by destroyers.
Then you can start adding cards that add power. Blue Marvel, for example, will give all of your cards on the board +1 power. Iron Man will double a location’s total power, and Hulk Buster will attach itself to one card at a location and add +4 power to it. Any of these could be useful when the dust settles a bit.
Some helpful starter cards are Squirrel Girl, who will add a +1 squirrel to each location, and Mister Sinister, who will split into two +2 cards. Brood is also kind of fun. It costs three energy to play, but it adds two +2 “broodlings” to the location. If you play Carnage in the fourth spot, it would be worth +8. Which cards you use is up to your individual strategy. You can’t control your hand, so make sure you have a little flexibility built in!
All-star Destroyers
If you can unlock these cards, your destroy decks get even more impressive! Some of these are in higher pools though, so you will have to work to get them.
- Deadpool: Every time this one-cost, +1 power card is destroyed, it comes back with double the power.
- Bucky Barnes: When the two-cost, +1 power Bucky Barnes is destroyed, a +6 Winter Soldier takes its place.
- Arnim Zola: This card may cost a lot and have +0 power, but if you use it correctly, it can be a huge asset. Arnim Zola will destroy one random card at a location and add a copy of that card to the other two. There is a deck build example below.
- Death: She’s a big fan of you destroying your own cards. This nine-cost card is +12 power and becomes cheaper with every card you destroy! With each card destroyed, Death costs one less energy to play.
Build: Arnim Zola

For this build, the idea is to get either Deadpool, Venom, or Death supercharged enough to send to two locations. You can’t determine when you will get each card, so it’s good to think about each strategy you could use instead. Starting with Nova would be ideal. Then playing Forge to power up your next card puts you in a prime spot for the ultimate Deadpool. On the third turn, if it’s possible to play Deadpool, do it! Deadpool plus Carnage will get you Carnage at +9 and Deadpool at +8 by the end of round three.
If you’re aiming for Deadpool, Killmonger will kill him again from any other location. Nova, Forge, Deadpool, Carnage, and then Killmonger will give you a +16 Deadpool in four moves. On the fifth round, you can use Venom, to double Deadpool to +32. If Venom isn’t available, Death should only cost five energy, so you can play her. The important thing to remember is that Arnim Zola is played on the sixth turn and needs an empty space at the same location as Deadpool, Venom, or Death. This is why it’s important to play Killmonger at a different location. Arnim Zola will copy a random card, so try to make it count.
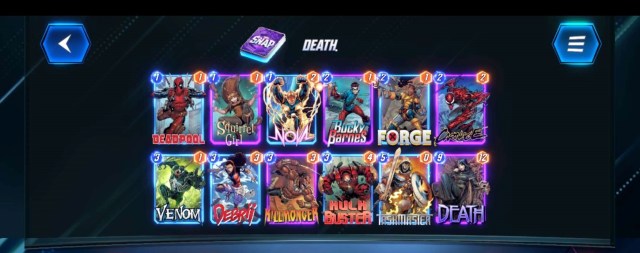
Build: Death

Death packs the same punch as The Hulk, but she can be more cost-effective if you’re destroying cards. This build centers around summoning Death for cheap by round six. The best way, if your hand will allow it, is the following order. Move one is Nova. Then Bucky Barnes at the same location on round two. Round three is the classic one-two punch of Deadpool and then Carnage. By the end of round three, you have a +9 Carnage, +4 Deadpool, and +6 Winter Soldier.
In round four, use Venom. This gives you a +8 Deadpool and +20 Venom at one location. Then on the fifth round, you can use Taskmaster at a different location. Taskmaster will be the same power as the last card you played, which in this case is the +20 Venom! By round six, Death only costs three energy to play, so you can pair her with Taskmaster to get +32 total energy at a location. You can even sneak in Killmonger to kill Deadpool one last time and get a +16 Deadpool.
These are just two examples of destroy build decks and their best-case scenarios, but hopefully, this gives you an idea of how to stack your destroyer decks moving forward. The name of the game is flexibility though, so don’t get too frustrated if that ultimate combo doesn’t pan out. And if you’re just starting out, we also have some tips for the best pool 1 decks in Marvel Snap.


